Last updated: 06 Jul 2026
A wardrobe is the one part of a bedroom you open every single morning, half-asleep, usually in a hurry. Get the design wrong and you feel it daily — clothes crammed sideways, shoes in a heap, the door you keep walking into. Get it right and you barely think about it. That’s the goal.
This guide covers how to design a wardrobe that actually fits your room and the way you live — built-in versus walk-in, door types, internal layout, and the organisation tricks that make a small Auckland bedroom work harder. Whether you’re starting from scratch or sorting out a do-up, start with the two things that decide everything else: the shape of your room, and how much you own.
A built-in wardrobe is usually the right call for a compact bedroom. It’s made to fit the wall exactly, so you get maximum storage with the smallest possible footprint. If you’ve got more room to play with, a walk-in wardrobe opens up far more flexibility in layout and storage.
The short version: what works in Auckland bedrooms
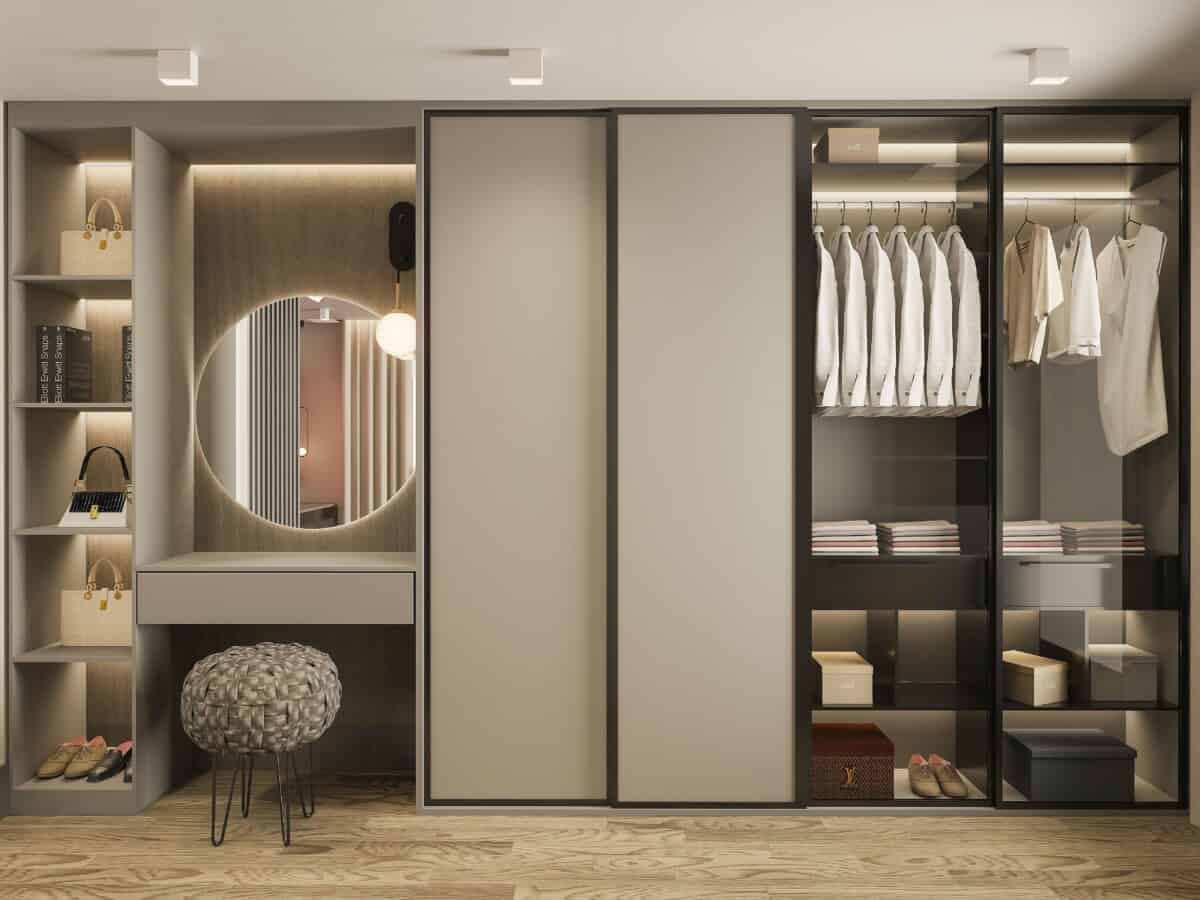
If you’re tight on floor space, the three design moves that make the biggest difference are: sliding doors instead of hinged ones, full-height cabinetry instead of stopping at standard door height, and a layout planned around what you actually own rather than a generic template.
- Sliding doors — best for apartments and small bedrooms in Ponsonby, Grey Lynn and Mount Eden. A hinged door needs a clear swing arc in front of it; a slider needs none. In a tight room, that’s the difference between a walkway and a bottleneck. Add mirrored fronts and the room reads brighter and larger, because the mirror bounces daylight back into the space.
- Full-height cabinetry — best for villas and townhouses with high ceilings in Remuera, Parnell and Mt Eden. Running the wardrobe to the ceiling captures the dead zone above a standard-height unit. That top section is ideal for seasonal and rarely-used storage, and it stops dust collecting on a cabinet top.
- Soft-close, handle-free units — best for open-plan and noise-sensitive homes. Soft-close runners and hinges stop the bang, and a handle-free (push-to-open or finger-pull) front gives a clean wall finish that disappears into the room.
💡 Design tip: In a small bedroom, decide doors first. The door type sets how much usable floor you keep, and everything else — bed placement, where you stand to get dressed — follows from it.
What a wardrobe costs in Auckland
The cost of wardrobe cabinetry in Auckland swings widely depending on size, layout, the materials you choose, and how complex the design gets. As a rough guide, a basic built-in wardrobe typically runs $2,000 to $5,000, while a full walk-in wardrobe usually lands between $10,000 and $20,000. Those are starting points, not quotes — the only way to know your number is to price your actual space.
Our calculator gives you a quick ballpark in a couple of minutes, no obligation:
Try the standard wardrobe cost calculator
Wardrobe door types compared
Doors are the single biggest design decision in a wardrobe. They set how much floor you keep, how the room feels, and how much you’ll spend. Here’s how the common options stack up.
| Door type | Floor space in front | Best for | Trade-off |
|---|---|---|---|
| Sliding (mirrored) | No swing arc needed | Small, low-light apartments — Britomart, Ponsonby, Viaduct | Only one side of the opening is accessible at a time |
| Sliding (solid) | No swing arc needed | Budget fit-outs where light isn’t the issue — Grey Lynn, Onehunga | No light gain; same one-side-at-a-time access |
| Bi-fold | Small swing, folds flat | Medium bedrooms needing full-width access — Mt Eden, Remuera | More moving parts; hinges need occasional adjustment |
| Hinged | Full door swing required | Larger rooms where access matters most — family homes | Eats the most floor space of any option |
| Pocket / cavity slider | Doors disappear into wall | Clean, minimal looks — heritage do-ups in Herne Bay, Devonport | Needs a wall cavity built in; most expensive to install |
💡 Design tip: Mirrored sliders earn their keep in a dark bedroom — they give you a full-length mirror you’d have bought anyway, and the reflection makes the room feel less boxed-in. In a room that already gets good light, a solid slider does the same space-saving job for less.
Wardrobe organisation ideas
1. Dedicate a wall to built-ins
You can never have too many clothes, but you can run out of room to put them. In a small walk-in, give one full wall over to accessories and apparel and leave the opposite wall clear as a walkway. Keeping one side open stops the room feeling like a corridor you’re squeezing through.
2. Put hats and shoes on the door
The inside face of a door is dead space most people ignore. Hooks for hats or a rail for heels turn it into storage you didn’t know you had — pick whichever your collection needs more.
3. Map outfits on a rack
Most of us deep-clean the wardrobe about once a year and swear we’ll keep it tidy. A freestanding clothing rack helps. Keep everything behind doors except the week’s outfits, hung where you can see them. Planning ahead cuts the morning scramble and lets you actually experiment with combinations.

4. Install a wall shelf
When the wardrobe’s full, go up the wall. A multi-level wall shelf puts your best pieces on display and works as a mini etagere for the things you actually want to look at.
5. Keep it behind closed doors
An open wardrobe shows every bit of clutter. Doors that sit flush with the wall hide the lot and give the room a clean, calm finish. Match the door colour to the wall and the wardrobe all but disappears.

6. Get creative with bulky clothes
Shoe organisers aren’t only for shoes. They’re also handy for chunky knits and jumpers you’d rather not pile loose on a shelf where they slump and spread.
7. Organise by season
Pull out-of-season clothes into baskets under the bed or in another part of the house. You free up room for what you’re actually wearing, and you’re not reaching past a winter coat to grab a t-shirt in January. The seasonal swap also forces a regular cull — anything you haven’t worn gets donated or binned.
8. Add a dresser and a mirror
If you’ve got a walk-in, move the dresser inside and sit a decent mirror on top. It clears your bedroom and keeps everything you need to get dressed in one place.
9. Use wasted wall space
Scarves and belts hung on hangers chew through rod space fast. A simple towel bar fixed to an empty bit of wall turns into a tidy display for them instead.
10. Allocate hanging space for long and short items
Folding things over a single rail leaves coats brushing the floor and shirts crushed. Plan a few different hanging heights instead. Separate zones for long and short items keep everything off the ground and easy to find.

11. Add a clothing rack to the corner of your room
A garment rack in a bedroom corner takes pressure off the wardrobe and doubles as a way to show off your go-to pieces. Cheap, flexible, and easy to move if the layout changes.
12. Learn better folding techniques
A tighter fold fits more into a drawer and stops the stack toppling. It’s the least glamorous tip here and one of the most effective.
13. Hang a closet organiser with shelves
Short on built-in shelving? A hanging shelf organiser uses the vertical space under your rail for jumpers, bags and the things that won’t sit flat anywhere else.

14. Make room for a hamper
Build a hamper into the layout. If there’s somewhere obvious for dirty clothes to go, they’re far more likely to land there than on the floor.
15. Use over-the-door organisers for hard-to-fold items
Belts, blankets, scarves, swaddles — the awkward stuff. An over-the-door shoe organiser handles all of it without taking up a single shelf.
💡 Design tip: Before you buy a single organiser, count what you own — rough numbers for hanging items, folded items, shoes and accessories. A wardrobe planned around your actual wardrobe always beats one planned around a showroom photo.
16. Store bags upright using dividers
If you can’t see it, you won’t use it — no matter how much you love it. Keep bags visible by hanging them on hooks inside the door or standing them upright with dividers so they hold their shape and stay off the floor.
When you’re planning the inside of a wardrobe, work back from what you store. Need more room for shoes than the average person? Want a dressing table or a chest of drawers built in? Those answers decide the internal layout long before you pick a door or a finish.
Internal layout: what goes where
The fittings inside the wardrobe matter more than the doors most people obsess over. Here’s how the common internals earn their space.
- Double-hang rails: Two rails stacked in one bay roughly double the room for shirts, blouses and folded-over trousers. The single best move for fitting more into a reach-in wardrobe.
- Pull-out drawers: Best for folded clothes, socks and underwear. Soft-close runners keep them quiet — worth it in an open-plan home where the bedroom isn’t far from the living space.
- Shoe shelves: Angled or flat shelving keeps pairs visible and off the floor. Easy to scale up in a family home where the shoe count only grows.
- Vertical racks and pegboards: Get bags, hats and belts off the floor and onto the wall, which frees the footprint for things that actually need it.
- Pull-out tie and belt organisers: Fit into a narrow drawer and keep small accessories from becoming a tangle.
💡 Design tip — Auckland humidity: If you’re near the coast — Takapuna, Devonport, the eastern bays — spec stainless steel or powder-coated internal fittings rather than bare steel. Salt air rusts cheap hardware fast, and a rusted rail stains everything hanging on it.
Standard wardrobe dimensions in NZ
Before you design anything, it helps to know the numbers a wardrobe has to hit to actually work. These are the standard dimensions we build to in New Zealand. Use them as a sanity check against any space you are planning, whether it is a reach-in for a Grey Lynn bedroom or a walk-in in a new Hobsonville build.
| Element | Standard dimension | Why it matters |
|---|---|---|
| Hanging depth (rail to closed door) | 580–600mm | A coat hanger sits about 550mm wide. Under 580mm and clothes press against the door. |
| Long-hang rail height | 1,600–1,800mm off the floor | Clears full-length coats and dresses without them brushing the base. |
| Double-hang rails | ~1,050mm + ~1,050mm | Two rails stacked for shirts and folded trousers; roughly doubles hanging capacity. |
| Shelf depth | 300–400mm | Deep enough for folded knits, shallow enough that you can still see the back. |
| Drawer opening (folded clothes) | 150–250mm high | Tall enough for stacked jumpers without the drawer jamming. |
| Walk-in walkway (clear) | 900–1,100mm | Room to open a drawer fully and still stand to get dressed. |
| Hinged door leaf width | 450–600mm | Wider leaves put more leverage on the hinges and sag over time. |
💡 Design tip: In an older villa or bungalow, measure the wall at floor, mid-height and ceiling before you trust a single number. Character-home walls are rarely square, and a built-in has to be scribed to the wall you actually have, not the one on the plan.
Wardrobe design tips
1. Calculate the numbers
List everything that has to go in. Hanging items, folded items, shoes, accessories. That tally tells you how much hanging, shelving and drawer space you actually need — and stops you building a wardrobe that’s half empty or bursting on day one.
2. Prioritise space for dresses and longer hanging clothes
Set out your long-hang section first so dresses and coats clear the floor, then fit shelves and drawers around it. Double-hang whatever’s left over to make the most of the height.

3. Fold knits and jumpers to protect them
Hanging heavy knits stretches them out of shape. Fold jumpers, knits and tees flat in a drawer or on a shelf instead. A consistent folding system also means you can spot the jumper you want without unstacking the whole pile.
4. Plan extra shoe storage
If parting with old shoes isn’t your strong suit, build in more shoe storage than you think you need. A flat shelf holds plenty, and storing pairs heel-to-toe squeezes more onto every level.
Think about the overall look too. Modern, classic, or fully custom — the wardrobe should sit with the style of the room, not fight it.
5. Why sliding mirrored doors suit small apartments
In a bedroom under about 10 m² — the kind you find in Britomart, Viaduct and Ponsonby apartments — sliding doors aren’t really optional. A hinged door needs a clear arc of floor in front of it that you then can’t use for anything else. In a small room that arc is the difference between getting a bed in comfortably or not. Mirrored fronts add a second job: they reflect whatever daylight the room gets, so a dim bedroom reads brighter and more open than a wall of solid doors ever would.
7 walk-in wardrobe design tips
1. Add a proper light source
A walk-in is your space, so light it the way you like. A pendant or even a small chandelier lifts the whole room. Warm light makes a snug walk-in feel cosy; cooler white light is better if you’re using it as your main dressing area, because it shows colours more honestly. Where you can, bring in natural light through a window or skylight, and place a mirror to push that light further around the room.
2. Light the shelves and cabinets
A walk-in lives or dies on whether you can see into it. Strip lighting along shelves and inside cabinets means you can match an outfit without dragging everything out to the doorway to check the colour. It also turns your better pieces into a bit of a display.

3. Get the layout right
Plan the walk-in around how you actually use it. Split the space into hanging, shelving and drawers, and put the things you reach for daily at eye level. Corners are easy to waste — use angled shelving or a corner rail so they pull their weight.
4. Add a vanity corner
A small vanity nook makes a walk-in feel like a proper dressing room rather than a glorified cupboard. If you’ve got the space, it’s one of the best uses of a spare corner — somewhere to do your makeup or jewellery with everything to hand.

5. Use mirrors well
Mirrors do three jobs in a walk-in at once.
First, they make a tight room feel bigger — a full-length mirror on a door or a mirrored panel pushes the perceived edges of the space outward, which matters most in a small or windowless walk-in. Second, they work with the light: line a mirror up with a window or skylight and it spreads daylight around the room, which also helps you judge colours accurately when you’re getting dressed. Third, they’re simply useful — a full-length mirror gives you the head-to-toe check before you walk out the door.
Beyond the practical, a framed mirror in a finish that suits the room becomes a design piece in its own right. Place them around how you actually use the space — a dedicated spot by the vanity, an adjustable one if you like checking the back of an outfit.
6. Use hangers for open wardrobes
Open shelving paired with hangers keeps everything visible and within reach. It’s a good fit for a walk-in where you want quick access and don’t mind your clothes being on show.

7. Use the vertical space
However small the walk-in, the height is yours to use. Sliding doors, shelves to the ceiling and a row of hooks give you more storage without borrowing a single extra square metre of floor. Stash bulky or seasonal gear up high and keep the everyday stuff at arm’s reach.
8. Add smart touches if they suit you
A few small upgrades earn their place in a walk-in. Motion-sensor lighting that comes on as you step in saves fumbling for a switch with your arms full. In a damp Auckland winter, a small dehumidifier or good ventilation keeps moisture off your clothes — worth thinking about if the room sits on a cooler, less-aired side of the house. And a mirror with built-in, adjustable lighting makes getting ready easier on dark mornings. None of it’s essential, but each one removes a small daily annoyance.
Whatever you add, keep usability front of mind. The best wardrobe is the one you don’t have to think about — pull-out shelves, the right mix of hanging space, and drawers where you’d instinctively reach for them. Get the size, the internals, the look and the function working together and you’ve got a wardrobe that fits your room and your life.
When you are ready to turn these ideas into a fitted design, our team measures your room, plans the internal layout around what you own, and gives you a fixed quote. See how we work with you, explore the custom wardrobes we build in our Auckland factory, or compare your options in our guides to wardrobe systems and freestanding wardrobes.
Standard wardrobe cost calculator
Wardrobe cabinetry in Auckland varies a lot with size, layout, materials and design complexity. The calculator gives you a quick, rough idea of what your space might cost before you commit to anything.
Try the standard wardrobe cost calculator
Frequently Asked Questions
How important is good wardrobe design?
Good wardrobe design keeps your clothes organised so everything has a place instead of ending up in a heap. It puts clothes, shoes and accessories together in one spot, which makes it far easier to see your options and get dressed without the morning hunt.
How can I customise my wardrobe?
Start with the layout and size of your room and work out how big a wardrobe it can take. Then map your storage needs: how many drawers, how much hanging space, whether you need overhead storage for seasonal items. Building around what you actually own is what makes a wardrobe genuinely useful.
How much does a wardrobe cost in Auckland?
It depends on the type of wardrobe and the materials you choose. As a rough guide, a basic built-in wardrobe runs around 2,000 to 5,000 dollars, while a full walk-in wardrobe usually lands between 10,000 and 20,000 dollars. The only way to get an accurate figure is to price your specific space.
Do sliding doors really save space in a small bedroom?
Yes. A hinged door needs a clear swing arc of floor in front of it that you cannot use for anything else. A sliding door needs none, so in a small bedroom it frees up the floor a hinged door would have blocked. The trade-off is that you can only access one side of the opening at a time.
Are mirrored wardrobe doors a good idea in a dark room?
They help. A mirrored front reflects whatever daylight the room gets back into the space, so a dim bedroom reads brighter and feels less boxed-in than it would with solid doors. You also get a full-length mirror built in, which saves buying a separate one.
Built-in or walk-in wardrobe for a small Auckland bedroom?
For a compact bedroom, a built-in is usually the better call. It is made to fit the wall exactly, so you get maximum storage with the smallest footprint. A walk-in needs more floor area to work and suits larger villas and townhouses where there is room to spare.


 14")
